Last night when fedora 10 came on air, it was a painful sleep at home, because i was unable to manage myself without upgrading my office's desktop PC to fedora 10, of course the best way that suites me is using yum, so here are those two steps that accomplished my objective today:
Step 1:
#rpm -Uvh your-mirror/fedora/releases/10/Fedora/i386/os/Packages/fedora-release-10-1.noarch.rpm your-mirror/fedora/releases/10/Fedora/i386/os/Packages/fedora-release-notes-10.0.0-1.noarch.rpm
e.g.
#rpm -Uvh http://ftp.univie.ac.at/systems/linux/fedora/releases/10/Fedora/i386/os/Packages/fedora-release-10-1.noarch.rpm http://ftp.univie.ac.at/systems/linux/fedora/releases/10/Fedora/i386/os/Packages/fedora-release-notes-10.0.0-1.noarch.rpm
Step 2:
#yum clean all
#yum update -y
PS: You need to run all above commands as root !
cheers
Wednesday, November 26, 2008
Sunday, November 23, 2008
Bypass/Break Firewall to chat on gmail
Ohh, it was a nightmare when i resumed my duties after vocations and noticed that i am unable to chat on gmail/msn/yahoo though the real shock was about gmail, the communication team has blocked all sort of chat in office except that homosexual Jabber LAN chat :p
After a long googling i found a solution using Pidgen on Linux/Windows, bypass/break firewall for gtalk/gmail chat, here it is:
configure your gmail account on Pidgen as follow:
 fill in Basic tab as:
Protocol: XMPP
username: your-gmail-username
domain: gmail.com
Resource: Home
Password: gmail-password
fill in Advanced tab as:
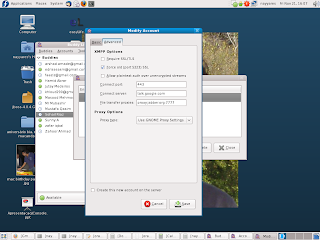 Require SSL/TSL: uncheck
Force old port (5223)SSL: check/select
Allow plan text auth...: uncheck
Connect Port: 443
Connect Server: talk.google.com
File transfer proxy: leave default
Proxy type: use gnome proxy settings
Happy gmail chatting, behind firewall !
Cheers
Monday, November 17, 2008
Oracle 10.2.0.1.0 installation error on solaris 10
I was trying to install Oracle 10g on the Solaris 10 SPARC 64 and during linking I got the following error message:
Error in invoking 'ioracle' of makefile '/opt/home/oracle10g/rdbms/lib/ins_rdbms.mk'.
I successfully had installed 10g clusterware, just got this error on oracle database server installation.
FIX:
I was able to fix it by editing /etc/system file and adding following,
set noexec_user_stack=1
set shmsys:shminfo_shmmax=4294967295
set shmsys:shminfo_shmmni=100
set semsys:seminfo_semmni=100
set semsys:seminfo_semmns=1024
set semsys:seminfo_semmsl=256
set semsys:seminfo_semvmx=32767
after a reboot, i did the installation successfully.
cheers
Friday, November 14, 2008
step-by-step RAC 10g R2, Solaris 10, SPARC
1. creation oracle user:
bash-3.00# groupadd -g 500 dba
bash-3.00# groupadd -g 501 oinstall
bash-3.00# groupadd -g 502 oper
bash-3.00# useradd -u 500 -d /export/home/oracle -g oinstall -G dba,oper oracle
bash-3.00# mkdir /export/home/oracle
bash-3.00# chown -R oracle:oinstall /export/home/oracle/
bash-3.00# passwd oracle
New Password:
Re-enter new Password:
passwd: password successfully changed for oracle
2. setting up network configurations...
ON NODE-1
bash-3.00# ifconfig -a
lo0: flags=2001000849 mtu 8232 index 1
inet 127.0.0.1 netmask ff000000
ce0: flags=1000843 mtu 1500 index 2
inet 172.31.6.67 netmask fffffff0 broadcast 172.31.6.79
groupname ipmp0
ether 0:3:ba:af:24:eb
ce0:1: flags=9040843 mtu 1500 index 2
inet 172.31.6.68 netmask fffffff0 broadcast 172.31.6.79
ce1: flags=1008843 mtu 1500 index 5
inet 172.16.0.129 netmask ffffff80 broadcast 172.16.0.255
ether 0:3:ba:b1:9f:b8
ce2: flags=9040843 mtu 1500 index 3
inet 172.31.6.69 netmask fffffff0 broadcast 172.31.6.79
groupname ipmp0
ether 0:3:ba:b1:9f:b9
ce5: flags=1008843 mtu 1500 index 4
inet 172.16.1.1 netmask ffffff80 broadcast 172.16.1.127
ether 0:3:ba:af:24:ec
clprivnet0: flags=1009843 mtu 1500 index 6
inet 172.16.4.1 netmask fffffe00 broadcast 172.16.5.255
ether 0:0:0:0:0:1
Note: all of the front end IPs must be in the same network, so in our case, the node-1 has two IPs that is,
ce0: 172.31.6.67 ---> physical ethernet card
ce0:1 172.31.6.68 ---> logical ethernet card (going to be used for VIP)
ON NODE- 2
bash-3.00# ifconfig -a
lo0: flags=2001000849 mtu 8232 index 1
inet 127.0.0.1 netmask ff000000
ce0: flags=1000843 mtu 1500 index 2
inet 172.31.6.70 netmask fffffff0 broadcast 172.31.6.79
groupname ipmp0
ether 0:3:ba:c2:3a:15
ce0:1: flags=9040843 mtu 1500 index 2
inet 172.31.6.71 netmask fffffff0 broadcast 172.31.6.79
ce1: flags=1008843 mtu 1500 index 5
inet 172.16.0.130 netmask ffffff80 broadcast 172.16.0.255
ether 0:3:ba:b1:c7:34
ce2: flags=9040843 mtu 1500 index 3
inet 172.31.6.72 netmask fffffff0 broadcast 172.31.6.79
groupname ipmp0
ether 0:3:ba:b1:c7:35
ce5: flags=1008843 mtu 1500 index 4
inet 172.16.1.2 netmask ffffff80 broadcast 172.16.1.127
ether 0:3:ba:c2:3a:16
clprivnet0: flags=1009843 mtu 1500 index 6
inet 172.16.4.2 netmask fffffe00 broadcast 172.16.5.255
ether 0:0:0:0:0:2
Note: all of the front end IPs must be in the same network, so in our case, the node-1 has two IPs that is,
ce0: 172.31.6.70 ---> physical ethernet card
ce0:1 172.31.6.71 ---> logical ethernet card (going to be used for VIP)
3. extraction of oracle clusterware & RDBMS installation binaries...
#gunzip 10gr2_cluster_sol.cpio.gz
#cpio -idcvm < style="font-weight: bold;">
4. setting up the oracle user profile:
------ NODE 1 -----
vi /export/home/oracle/.profile
----- paste the following text inside .profile on node -1 ----
stty erase "^H"
set -o vi
export ORACLE_BASE=/opt/app/oracle
export ORACLE_HOME=$ORACLE_BASE/product/10.2.0
export ORACLE_SID=utrafedb1
export ORACLE_TERM=xterm
export LD_LIBRARY_PATH=$ORACLE_HOME/lib:/lib:/usr/lib:/usr/local/lib
export PATH=$PATH:$ORACLE_HOME/bin
SYSTEM_Name=`uname -n`
export SYSTEM_Name
export PS1='$SYSTEM_Name:$ORACLE_SID:$PWD/$ '
alias ll='ls -al'
alias sss='sqlplus "/as sysdba"'
-----NODE 2 ----
vi /export/home/oracle/.profile
----- paste the following text inside .profile on node -2 ----
stty erase "^H"
set -o vi
export ORACLE_BASE=/opt/app/oracle
export ORACLE_HOME=$ORACLE_BASE/product/10.2.0
export ORACLE_SID=utrafedb2
export ORACLE_TERM=xterm
export LD_LIBRARY_PATH=$ORACLE_HOME/lib:/lib:/usr/lib:/usr/local/lib
export PATH=$PATH:$ORACLE_HOME/bin
SYSTEM_Name=`uname -n`
export SYSTEM_Name
export PS1='$SYSTEM_Name:$ORACLE_SID:$PWD/$ '
alias ll='ls -al'
alias sss='sqlplus "/as sysdba"'
5. creating sub-directories for oracle installation...
bash-3.00# mkdir /opt/app
bash-3.00# mkdir /opt/app/oracle
bash-3.00# chown -R oracle:oinstall /opt/app/oracle/
bash-3.00# chmod 755 /opt/app/oracle/
6. configure rsh i.e. passowrdless remote loging for both nodes....
---login as oracle user, and give following commands---
$echo "+ oracle" > /export/home/oracle/.rhosts
note: have to edit sshd_config to all .rhosts based remote login....while have to allow oracle user for ssh in /etc/profile.
--- to test from node-1 ---
$ rsh node-2
7. prechecking the clusterware installation.
excute following command as oracle user
bash-3.00$ sh runcluvfy.sh stage -pre crsinst -n node-1,node2
8. Installing the UDLM package on both nodes...as root
#cd /export/home/nahmad/oracle-bin/crs/racpatch
#cp ORAUDLM.tar.Z /tmp
#cd /tmp
#uncompress ORAUDLM.tar.Z
#tar xvf ORAUDLM.tar
#pkgadd -d . ORAUDLM
#reboot
9. Installing Oracle Clusterware...Login as Oracle user on server.
$cd /export/home/nahmad/oracle-bin/crs
$./runinstaller
10. create directory for Oracle clusterware binaries
$mkdir /opt/app
$chown -R /opt/app/
11. giving the input in installer....
- on first screen:
path of inventory dir: /opt/app/oracle/oraInventory
group: oinstall
- on second screen:
crs home name: OraCrs10g_utrafe
path: /opt/app/oracle/product/10.2.0/crs
- on fourth screen:
-----Before this you need to run following commands on BOTH NODES i.e ----
#ifconfig ce0:1 down
cluster_name: crs
cluster nodes:
node-1 clusternode1-priv node-1-vip
node-2 clusternode2-priv node-2-vip
- on fifth screen
ce0 Public
ce1 DO NOT USE
ce2 DO NOT USE
ce5 Private
clprivnet0 Private
-on sixth screen
check: Normal redundancy
bash-3.00# ln -s /dev/md/orarow_dg/rdsk/d2 /dev/rdsk/ora_ocr_raw_100m
bash-3.00# ln -s /dev/md/orarow_dg/rdsk/d4 /dev/rdsk/ora_ocr_raw_100m_mir
bash-3.00# ln -s /dev/md/orarow_dg/rdsk/d6 /dev/rdsk/ora_vote_raw_100m
bash-3.00# ln -s /dev/md/orarow_dg/rdsk/d8 /dev/rdsk/ora_vote_raw_100m_mir1
bash-3.00# ln -s /dev/md/orarow_dg/rdsk/d11 /dev/rdsk/ora_vote_raw_100m_mir2
bash-3.00# chown oracle:oinstall /dev/md/orarow_dg/rdsk/d2 /dev/rdsk/ora_ocr_raw_100m
bash-3.00# chown oracle:oinstall /dev/md/orarow_dg/rdsk/d4 /dev/rdsk/ora_ocr_raw_100m_mir
bash-3.00# chown oracle:oinstall /dev/md/orarow_dg/rdsk/d6 /dev/rdsk/ora_vote_raw_100m
bash-3.00# chown oracle:oinstall /dev/md/orarow_dg/rdsk/d8 /dev/rdsk/ora_vote_raw_100m_mir1
bash-3.00# chown oracle:oinstall /dev/md/orarow_dg/rdsk/d11 /dev/rdsk/ora_vote_raw_100m_mir2
bash-3.00# chmod 660 /dev/md/orarow_dg/rdsk/d2 /dev/rdsk/ora_ocr_raw_100m
bash-3.00# chmod 660 /dev/md/orarow_dg/rdsk/d2 /dev/rdsk/ora_ocr_raw_100m_mir
bash-3.00# chmod 660 /dev/md/orarow_dg/rdsk/d6 /dev/rdsk/ora_vote_raw_100m
bash-3.00# chmod 660 /dev/md/orarow_dg/rdsk/d8 /dev/rdsk/ora_vote_raw_100m_mir1
bash-3.00# chmod 660 /dev/md/orarow_dg/rdsk/d11 /dev/rdsk/ora_vote_raw_100m_mir2
bash-3.00# dd if=/dev/zero of=/dev/rdsk/ora_ocr_raw_100m bs=8192 count=1000
1000+0 records in
1000+0 records out
bash-3.00# dd if=/dev/zero of=/dev/rdsk/ora_ocr_raw_100m_mir bs=8192 count=1000
1000+0 records in
1000+0 records out
bash-3.00# dd if=/dev/zero of=/dev/rdsk/ora_vote_raw_100m bs=8192 count=1000
1000+0 records in
1000+0 records out
bash-3.00# dd if=/dev/zero of=/dev/rdsk/ora_vote_raw_100m_mir1 bs=8192 count=1000
1000+0 records in
1000+0 records out
bash-3.00# dd if=/dev/zero of=/dev/rdsk/ora_vote_raw_100m_mir2 bs=8192 count=1000
1000+0 records in
1000+0 records out
bash-3.00# ls -laL /dev/rdsk/ora_*
crw-rw---- 1 oracle oinstall 85, 8194 Sep 17 08:51 /dev/rdsk/ora_ocr_raw_100m
crw-rw---- 1 oracle oinstall 85, 8196 Sep 17 08:52 /dev/rdsk/ora_ocr_raw_100m_mir
crw-rw---- 1 oracle oinstall 85, 8198 Sep 17 09:01 /dev/rdsk/ora_vote_raw_100m
crw-rw---- 1 oracle oinstall 85, 8200 Sep 17 09:01 /dev/rdsk/ora_vote_raw_100m_mir1
crw-rw---- 1 oracle oinstall 85, 8203 Sep 17 09:01 /dev/rdsk/ora_vote_raw_100m_mir2
12. running VIPCA: at the end of CRS installation, VIP configuration will fail and will give some error on running the root.sh script, ignore it and later run VIPCA.
$cd /opt/app/oracle/product/10.2.0/crs/bin
$./vipca
give the VIP IPs in the wizard to configure VIP, on the completion run following command to check the status.
$./crs_stat -t -v
13. installing Oracle RDBMS: use the article: http://www.databasejournal.com/features/oracle/article.php/3567476/RACing-ahead-with-Oracle-on-VMware---Part-4-Installing-RAC-Database-with-ASM-Option.htm
14: create Listner: http://www.databasejournal.com/features/oracle/article.php/10893_3567476_2/RACing-ahead-with-Oracle-on-VMware---Part-4-Installing-RAC-Database-with-ASM-Option.htm
15. create Database with ASM: http://www.databasejournal.com/features/oracle/article.php/10893_3567476_4/RACing-ahead-with-Oracle-on-VMware---Part-4-Installing-RAC-Database-with-ASM-Option.htm
PS: It is NOT an official Oracle's step-by-step, try with your own responsibility. though all steps carry useful comments.
Cheers
bash-3.00# groupadd -g 500 dba
bash-3.00# groupadd -g 501 oinstall
bash-3.00# groupadd -g 502 oper
bash-3.00# useradd -u 500 -d /export/home/oracle -g oinstall -G dba,oper oracle
bash-3.00# mkdir /export/home/oracle
bash-3.00# chown -R oracle:oinstall /export/home/oracle/
bash-3.00# passwd oracle
New Password:
Re-enter new Password:
passwd: password successfully changed for oracle
2. setting up network configurations...
ON NODE-1
bash-3.00# ifconfig -a
lo0: flags=2001000849
inet 127.0.0.1 netmask ff000000
ce0: flags=1000843
inet 172.31.6.67 netmask fffffff0 broadcast 172.31.6.79
groupname ipmp0
ether 0:3:ba:af:24:eb
ce0:1: flags=9040843
inet 172.31.6.68 netmask fffffff0 broadcast 172.31.6.79
ce1: flags=1008843
inet 172.16.0.129 netmask ffffff80 broadcast 172.16.0.255
ether 0:3:ba:b1:9f:b8
ce2: flags=9040843
inet 172.31.6.69 netmask fffffff0 broadcast 172.31.6.79
groupname ipmp0
ether 0:3:ba:b1:9f:b9
ce5: flags=1008843
inet 172.16.1.1 netmask ffffff80 broadcast 172.16.1.127
ether 0:3:ba:af:24:ec
clprivnet0: flags=1009843
inet 172.16.4.1 netmask fffffe00 broadcast 172.16.5.255
ether 0:0:0:0:0:1
Note: all of the front end IPs must be in the same network, so in our case, the node-1 has two IPs that is,
ce0: 172.31.6.67 ---> physical ethernet card
ce0:1 172.31.6.68 ---> logical ethernet card (going to be used for VIP)
ON NODE- 2
bash-3.00# ifconfig -a
lo0: flags=2001000849
inet 127.0.0.1 netmask ff000000
ce0: flags=1000843
inet 172.31.6.70 netmask fffffff0 broadcast 172.31.6.79
groupname ipmp0
ether 0:3:ba:c2:3a:15
ce0:1: flags=9040843
inet 172.31.6.71 netmask fffffff0 broadcast 172.31.6.79
ce1: flags=1008843
inet 172.16.0.130 netmask ffffff80 broadcast 172.16.0.255
ether 0:3:ba:b1:c7:34
ce2: flags=9040843
inet 172.31.6.72 netmask fffffff0 broadcast 172.31.6.79
groupname ipmp0
ether 0:3:ba:b1:c7:35
ce5: flags=1008843
inet 172.16.1.2 netmask ffffff80 broadcast 172.16.1.127
ether 0:3:ba:c2:3a:16
clprivnet0: flags=1009843
inet 172.16.4.2 netmask fffffe00 broadcast 172.16.5.255
ether 0:0:0:0:0:2
Note: all of the front end IPs must be in the same network, so in our case, the node-1 has two IPs that is,
ce0: 172.31.6.70 ---> physical ethernet card
ce0:1 172.31.6.71 ---> logical ethernet card (going to be used for VIP)
3. extraction of oracle clusterware & RDBMS installation binaries...
#gunzip 10gr2_cluster_sol.cpio.gz
#cpio -idcvm < style="font-weight: bold;">
4. setting up the oracle user profile:
------ NODE 1 -----
vi /export/home/oracle/.profile
----- paste the following text inside .profile on node -1 ----
stty erase "^H"
set -o vi
export ORACLE_BASE=/opt/app/oracle
export ORACLE_HOME=$ORACLE_BASE/product/10.2.0
export ORACLE_SID=utrafedb1
export ORACLE_TERM=xterm
export LD_LIBRARY_PATH=$ORACLE_HOME/lib:/lib:/usr/lib:/usr/local/lib
export PATH=$PATH:$ORACLE_HOME/bin
SYSTEM_Name=`uname -n`
export SYSTEM_Name
export PS1='$SYSTEM_Name:$ORACLE_SID:$PWD/$ '
alias ll='ls -al'
alias sss='sqlplus "/as sysdba"'
-----NODE 2 ----
vi /export/home/oracle/.profile
----- paste the following text inside .profile on node -2 ----
stty erase "^H"
set -o vi
export ORACLE_BASE=/opt/app/oracle
export ORACLE_HOME=$ORACLE_BASE/product/10.2.0
export ORACLE_SID=utrafedb2
export ORACLE_TERM=xterm
export LD_LIBRARY_PATH=$ORACLE_HOME/lib:/lib:/usr/lib:/usr/local/lib
export PATH=$PATH:$ORACLE_HOME/bin
SYSTEM_Name=`uname -n`
export SYSTEM_Name
export PS1='$SYSTEM_Name:$ORACLE_SID:$PWD/$ '
alias ll='ls -al'
alias sss='sqlplus "/as sysdba"'
5. creating sub-directories for oracle installation...
bash-3.00# mkdir /opt/app
bash-3.00# mkdir /opt/app/oracle
bash-3.00# chown -R oracle:oinstall /opt/app/oracle/
bash-3.00# chmod 755 /opt/app/oracle/
6. configure rsh i.e. passowrdless remote loging for both nodes....
---login as oracle user, and give following commands---
$echo "+ oracle" > /export/home/oracle/.rhosts
note: have to edit sshd_config to all .rhosts based remote login....while have to allow oracle user for ssh in /etc/profile.
--- to test from node-1 ---
$ rsh node-2
7. prechecking the clusterware installation.
excute following command as oracle user
bash-3.00$ sh runcluvfy.sh stage -pre crsinst -n node-1,node2
8. Installing the UDLM package on both nodes...as root
#cd /export/home/nahmad/oracle-bin/crs/racpatch
#cp ORAUDLM.tar.Z /tmp
#cd /tmp
#uncompress ORAUDLM.tar.Z
#tar xvf ORAUDLM.tar
#pkgadd -d . ORAUDLM
#reboot
9. Installing Oracle Clusterware...Login as Oracle user on server.
$cd /export/home/nahmad/oracle-bin/crs
$./runinstaller
10. create directory for Oracle clusterware binaries
$mkdir /opt/app
$chown -R /opt/app/
11. giving the input in installer....
- on first screen:
path of inventory dir: /opt/app/oracle/oraInventory
group: oinstall
- on second screen:
crs home name: OraCrs10g_utrafe
path: /opt/app/oracle/product/10.2.0/crs
- on fourth screen:
-----Before this you need to run following commands on BOTH NODES i.e ----
#ifconfig ce0:1 down
cluster_name: crs
cluster nodes:
node-1 clusternode1-priv node-1-vip
node-2 clusternode2-priv node-2-vip
- on fifth screen
ce0 Public
ce1 DO NOT USE
ce2 DO NOT USE
ce5 Private
clprivnet0 Private
-on sixth screen
check: Normal redundancy
bash-3.00# ln -s /dev/md/orarow_dg/rdsk/d2 /dev/rdsk/ora_ocr_raw_100m
bash-3.00# ln -s /dev/md/orarow_dg/rdsk/d4 /dev/rdsk/ora_ocr_raw_100m_mir
bash-3.00# ln -s /dev/md/orarow_dg/rdsk/d6 /dev/rdsk/ora_vote_raw_100m
bash-3.00# ln -s /dev/md/orarow_dg/rdsk/d8 /dev/rdsk/ora_vote_raw_100m_mir1
bash-3.00# ln -s /dev/md/orarow_dg/rdsk/d11 /dev/rdsk/ora_vote_raw_100m_mir2
bash-3.00# chown oracle:oinstall /dev/md/orarow_dg/rdsk/d2 /dev/rdsk/ora_ocr_raw_100m
bash-3.00# chown oracle:oinstall /dev/md/orarow_dg/rdsk/d4 /dev/rdsk/ora_ocr_raw_100m_mir
bash-3.00# chown oracle:oinstall /dev/md/orarow_dg/rdsk/d6 /dev/rdsk/ora_vote_raw_100m
bash-3.00# chown oracle:oinstall /dev/md/orarow_dg/rdsk/d8 /dev/rdsk/ora_vote_raw_100m_mir1
bash-3.00# chown oracle:oinstall /dev/md/orarow_dg/rdsk/d11 /dev/rdsk/ora_vote_raw_100m_mir2
bash-3.00# chmod 660 /dev/md/orarow_dg/rdsk/d2 /dev/rdsk/ora_ocr_raw_100m
bash-3.00# chmod 660 /dev/md/orarow_dg/rdsk/d2 /dev/rdsk/ora_ocr_raw_100m_mir
bash-3.00# chmod 660 /dev/md/orarow_dg/rdsk/d6 /dev/rdsk/ora_vote_raw_100m
bash-3.00# chmod 660 /dev/md/orarow_dg/rdsk/d8 /dev/rdsk/ora_vote_raw_100m_mir1
bash-3.00# chmod 660 /dev/md/orarow_dg/rdsk/d11 /dev/rdsk/ora_vote_raw_100m_mir2
bash-3.00# dd if=/dev/zero of=/dev/rdsk/ora_ocr_raw_100m bs=8192 count=1000
1000+0 records in
1000+0 records out
bash-3.00# dd if=/dev/zero of=/dev/rdsk/ora_ocr_raw_100m_mir bs=8192 count=1000
1000+0 records in
1000+0 records out
bash-3.00# dd if=/dev/zero of=/dev/rdsk/ora_vote_raw_100m bs=8192 count=1000
1000+0 records in
1000+0 records out
bash-3.00# dd if=/dev/zero of=/dev/rdsk/ora_vote_raw_100m_mir1 bs=8192 count=1000
1000+0 records in
1000+0 records out
bash-3.00# dd if=/dev/zero of=/dev/rdsk/ora_vote_raw_100m_mir2 bs=8192 count=1000
1000+0 records in
1000+0 records out
bash-3.00# ls -laL /dev/rdsk/ora_*
crw-rw---- 1 oracle oinstall 85, 8194 Sep 17 08:51 /dev/rdsk/ora_ocr_raw_100m
crw-rw---- 1 oracle oinstall 85, 8196 Sep 17 08:52 /dev/rdsk/ora_ocr_raw_100m_mir
crw-rw---- 1 oracle oinstall 85, 8198 Sep 17 09:01 /dev/rdsk/ora_vote_raw_100m
crw-rw---- 1 oracle oinstall 85, 8200 Sep 17 09:01 /dev/rdsk/ora_vote_raw_100m_mir1
crw-rw---- 1 oracle oinstall 85, 8203 Sep 17 09:01 /dev/rdsk/ora_vote_raw_100m_mir2
12. running VIPCA: at the end of CRS installation, VIP configuration will fail and will give some error on running the root.sh script, ignore it and later run VIPCA.
$cd /opt/app/oracle/product/10.2.0/crs/bin
$./vipca
give the VIP IPs in the wizard to configure VIP, on the completion run following command to check the status.
$./crs_stat -t -v
13. installing Oracle RDBMS: use the article: http://www.databasejournal.com/features/oracle/article.php/3567476/RACing-ahead-with-Oracle-on-VMware---Part-4-Installing-RAC-Database-with-ASM-Option.htm
14: create Listner: http://www.databasejournal.com/features/oracle/article.php/10893_3567476_2/RACing-ahead-with-Oracle-on-VMware---Part-4-Installing-RAC-Database-with-ASM-Option.htm
15. create Database with ASM: http://www.databasejournal.com/features/oracle/article.php/10893_3567476_4/RACing-ahead-with-Oracle-on-VMware---Part-4-Installing-RAC-Database-with-ASM-Option.htm
PS: It is NOT an official Oracle's step-by-step, try with your own responsibility. though all steps carry useful comments.
Cheers
Wednesday, November 5, 2008
lazy unmount, even when device is busy !
I was reading a short article on usb disk unmount problem, someone in comments remind the idea of Lazy unmount option i.e.
if you see something like this:
if you see something like this:
# umount /media/usbdisk/
umount: /media/usbdisk: device is busy


do this:

# umount -l /media/usbdisk/

the trick is behind -l option , LAZY UNMOUNT !


cheers
Subscribe to:
Posts (Atom)
